Fall is upon us again, and along with that cozy, back-to-school excitement also comes a rush of emails and phone calls from your eager applicants and their parents…”when will I hear back about my application?”
Many schools begin releasing their admission decisions as soon as leaves start changing and applications start trickling into the completed bins. Some schools like to build up the anticipation and release their first batch of admits between Halloween and Thanksgiving. And lastly, some schools like to keep students on their toes and do one release of decisions in Spring.
As for how these coveted letters get into the hands of students, there are lots of different approaches that schools decide to take. Some schools will opt to send a plain letter in a tall window envelope, either directly from their office or through a mailing house—straight and to the point. Some schools put together a carefully curated box full of goodies and literature to give them relevant information about the school they have just been accepted to and, hopefully, a few unique swag items that will set this school apart in the student’s mind. Some schools simply send an email pointing the student to a decision portal – “You’re in!”
Whatever your decision release process may look like, there is one thing we can all agree on: you don’t want to mess this up.
In the past 15 or so years, since electronic decision release has become more common (bye-bye filing cabinets and manilla folders!), there have been a number of stories in the news about erroneous communications to students and parents regarding their college admission decision, and even worse (read: costly), incorrect scholarship information. Whether these errors originate from a system-wide technical issue, human error, or faulty processes, there are a few practices you can put in place in your admissions office to give yourself some peace of mind when you drop those envelopes in the mail. Slate has made enrollment management as much of a breeze as it can be, providing users with a wealth of tools to refine their processes. While these tips use Slate-specific language and features, the core lessons can be applied to any CRM.
1. Use the data you have.
You collect a lot of data about students throughout their application lifecycle – make sure you are using it. Displaying key information, like school, GPA, and test scores (if applicable) can help you spot any inconsistencies within an application that could be cause for concern in admitting a student. If you are a Slate school, you can also add this Cluster Report to your instance to ensure that you have the full picture when it comes to students that attend the same school.
2. Have checks and balances throughout the reading process.
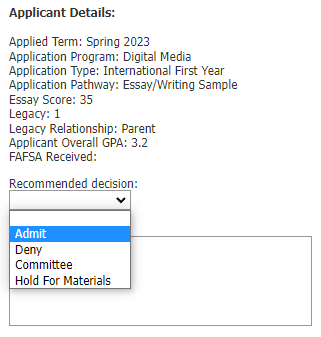
Slow and steady wins the race. However, in peak reading season, admissions staff could have reader queues a few hundred applications deep, and a deadline to clear them by COB. This is where mistakes could happen. To prevent a student from being moved to the Admit bin when they should really be held for grades (or perhaps flat-out denied), ensure that all readers who can recommend a decision have to select that recommended decision from a list, rather than simply moving the application into the “Admit” or “Deny” bin. This will come in handy later on for comparing recommended decisions to the actual decision you are about to apply to the student’s record.
3. Queries are your friend!
It can be tempting to just take every student in the Admit bin and apply an Admit decision to their record. Slate’s Decision Release Module has its own set of checks and balances, but no one knows your process like you do. This is why, in my decision release days, I liked to create super-custom Decision Release queries as a final check before assigning decisions and printing decision letters. This would ensure that not only were these students ready to be admitted, but the data I was giving to the letter processing team (whether that is in-house or external) is clean and clear and free of errors! Here are some fields I recommend including:
- ALL recommended decisions given throughout the reading process
- Student Name (beware of wacky nicknames 🤪)
- GPA/Test Scores/Class Rank
- Scholarship name and amount if being included in letter (this is a big one!)
- Mailing Address – make sure they are formatted correctly and within your mailing area!
- Counselor name – does every student have an assigned counselor?
- Application Term/Round – especially if you mail based on round
- Any other merge fields you include in your letter!
4. Test, Test, Test
Even if you primarily rely on physical letters to notify students of their decision, you likely still have an electronic version of your letter that is displayed via a portal. Remember to audit these letters year-to-year. Waybetter recommends that you archive each version of your letter templates so they act as a snapshot of what students received that cycle, as messaging and field merges can change. Most importantly, test your letter templates across all variations of students – scholarship/no scholarship, specific programs, international, and any other special population you need to account for. Also related to testing, be sure to test your physical letter formatting as well! Is everything merging in as expected? How is the spacing? Does this make sense for a physical letter vs. an electronic letter (no hyperlinks!)? You want this letter to feel and look special for the student.
5. Check, and check again.
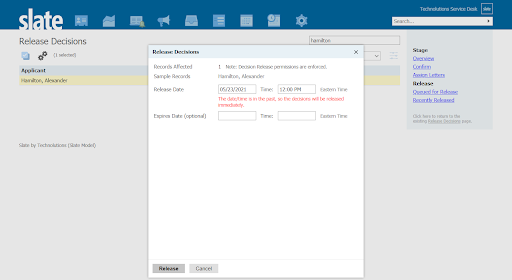
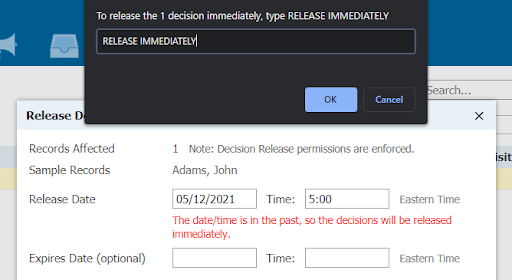
As mentioned before, Slate has a great Decision Release module that acts as a one-stop shop for the actual release of decisions. In this module, you must progress through the stages in sequential order (Confirm, Assign, Release), and Slate lays it all out for you with several warnings and opportunities to explicitly confirm your actions (as seen below). A few things to consider:
- Give yourself buffer time between confirming and releasing the decision. The first step is to confirm your decision, which you can do immediately, but we recommend setting your release date at least a few hours into the future. This gives you time to stop release if needed by un-releasing the decision before students are notified.
- You can apply custom views within the Decision Release tool to only show certain populations determined by pre-built filters and exports. This could not only serve as a final check (custom exports to display relevant data), but help you manage smaller groups of students that may have more specific decision considerations—such as different letter templates, release dates, or expiration dates.
All in all, decision release season is a happy one. Not only are students beginning to see all of their hard work pay off with college acceptances, but campuses are bustling with current students, Open Houses are in full swing, and counselors are returning from Fall travel and settling in for reading season. These tips will hopefully make sure your decision release goes off without a hitch, and the question of “Trick or Treat?” is only reserved for Halloween!